
Whether you’re a complete beginner to sourdough, or you jumped on the pandemic sourdough craze and are wondering whether you should toss that inactive starter sitting on your counter, this post is for you!
If you’ve heard of sourdough bread and are thinking of giving it a try, or are simply finding the whole sourdough idea overwhelming, give this post a read. I’ll provide an easy recipe for a basic sourdough loaf and simple instructions for getting a sourdough starter going. I promise, it’s not as intimidating as it seems!
Let’s dive into how to get started with your own sourdough at home!
What is Sourdough?
Sourdough is a bread dough that uses live yeasts and bacteria as the leavening agent.
With conventional bread, commercial yeast is added to the dough to help it rise. In the case of sourdough bread, the fermentation from the wild yeasts and bacteria in the starter is what makes it rise.
It is the unique fermentation process of sourdough bread that gives it its characteristic tangy flavour and makes it a healthy bread option.
How to Make Sourdough Bread
Sourdough bread is made by following three basic steps:
- Establish a sourdough starter
- Make the bread dough using the active starter
- Bake the bread
The best part about sourdough is that it is made from only three ingredients: flour, water, and salt!
The first step is to get your hands on a sourdough starter.
If you know someone with a starter who can give you a piece of it, or if you have an old inactive starter in your fridge, then you can just feed it and you’re good to go.
But if not, not to worry. You can easily make your own starter from scratch.
Starter is just flour and water. It becomes active once the natural yeasts and bacteria in the flour (along with those accumulated from the air) begin to ferment. As the grain ferments, gas is produced, which causes it to rise. In order to maintain an active and ready-to-use starter, you must continue to feed the starter (with flour and water) in order to feed the yeast and bacteria in it.
This active starter can then be used as a leavening agent for bread and other doughs.
How to Make a Sourdough Starter
You will need:
- Flour (any kind is fine. I usually use all purpose and whole wheat)
- Water
- A jar or container to keep the starter in (I use a mason jar with a coffee filter on top as a lid)
- A kitchen measuring scale (optional but highly recommended as it lets you accurately measure in grams)
Instructions:
- Add 100g of lukewarm water and 100g of flour (I do 50g all purpose, 50g whole wheat) to your jar and mix together. Make sure you mix well enough that there are no dry bits of flour left.
- Leave in a warm location for 12 hours to rise. (You can also leave it for 24 hours, but I find it becomes active quicker when you feed it every 12 hours).
- After 12 hours, to feed the starter, remove all but 50g of the starter in your jar. To that 50g, add 100g of water and 100g of flour again. Mix well.
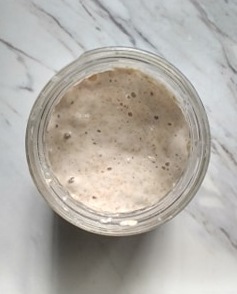
- Repeat this process of feeding your starter every 12 (or 24) hours until your starter becomes bubbly and consistently rises after each feeding. It should be airy and have a kind of marshmallow-y texture.
And that’s it! You have your active sourdough starter!
At this point, you can continue feeding your starter once or twice every day, and use it for breads and other baked goods when it is at its peak rise – about 5 or 6 hours after you feed it is when it has risen the most and will be quite bubbly.
However, if you are not going to use it very frequently, you can store it in the fridge so that you don’t have to keep feeding it every day.
Storing your starter:
Once you have a dependable, active starter, you can store it in the fridge and just take it out and feed it before you want to use it.
If you want to put it in the fridge to store, just feed it as usual, wait for it to rise a little bit (about 1-2 hours) but don’t let it rise to its peak, then put it in the fridge.
When you want to use your starter, take it out of the fridge the day before, and let it rise a bit at room temp before feeding it. You may need to feed it a couple more times (every 12 hours) before it bounces back to its active, bubbly state. Once it looks active again, you can bake with it as usual.
How to Make a Basic Sourdough Loaf

You will need:
- Active starter
- Flour (any kind is fine. I usually use a combination of bread flour, all purpose, and whole wheat)
- Water
- Salt
- A container (such as a plastic or glass bowl) to keep your dough in
- A kitchen measuring scale (optional but highly recommended)
- A dough scraper (optional)
- A proofing basket (optional)
- A Dutch oven
Instructions:
- Add 100g of active starter and 375g of lukewarm water to your container. Mix well. Add 500g of flour (use whatever flour(s) you want your loaf to have) and mix well enough that there are no dry bits of flour left.
- Leave in a warm location for 35-40 minutes. This is the hydration stage.
- Measure out 10g of salt. Wet your hands with water and squish the salt into your dough until it is thoroughly incorporated.
- Leave in a warm location for 30 minutes to rest.
- Fold your dough on itself by grabbing hold of one edge of the dough and stretching it up and across itself. Do this folding action 3 or 4 times, working your way around the dough.
- Leave in a warm location for 30 minutes. Repeat the folding process every 30 minutes for a total of 2 hours since the first fold.
- After 2 hours of folding every half hour, switch to folding every 45 minutes for a total of 1.5 hours. This is the bulk fermentation.
- Remove dough from container and put on a floured work surface. Shape it into a ball using a dough scraper if you have one, and dust it with flour. Leave to rest for 30 minutes. This is the bench rest. The dough should relax and flatten out a bit.
- Flour a proofing basket if you have one, Otherwise, prepare a container/bowl by lining it with a floured tea towel. Gently stretch and fold the edges of your dough ball in on itself like an envelope, and place upside down into the proofing basket or prepared container.
- Put in fridge overnight (12-18 hours) to slow the fermentation.
- The next morning, preheat your oven to 500° F with your Dutch oven inside.
- Place dough ball in your preheated Dutch over (you can flour the bottom or put parchment paper to make sure the bottom doesn’t burn and to make it easier to remove the bread afterwards). Score the dough with a knife or scoring blade, put the lid on the Dutch oven, and put it in the 500° F oven for 30 minutes.
- After 30 minutes, lower the temperature to 470° F, remove the lid of the Dutch oven, and let cook for an additional 15-25 minutes. You can play around with it to see what temperature and how long you want to cook it for, depending on how dark or light you want your loaf.
- Remove from the oven and let cool before cutting.
- Enjoy!
Now, if I’ve just completely overwhelmed you and all the folding throughout the day seems like way too much time and effort and confusion, I’ve got a short-cut method for you!
I’ve used this short-cut method many times and it always seems to turn out great, as long as my starter is well established and active. The bread may not be as airy in the end, but it’s a lot less work because you can leave it to bulk ferment overnight instead of folding it throughout the day.
Short-cut method instructions:
- Add 100g of active starter and 375g of lukewarm water to your container. Mix well. Add 500g of flour (use whatever flour(s) you want your loaf to have) and mix well enough that there are no dry bits of flour left.
- Leave in a warm location to hydrate for 35-40 minutes.
- Measure out 10g of salt. Wet your hands with water and squish the salt into your dough until it is thoroughly incorporated.
- Leave in a warm location for 30 minutes to rest.
- Fold your dough on itself by grabbing hold of one edge of the dough and stretching it up and across itself. Fold 3 or 4 times, working your way around the dough.
- At this point, you can either keep folding every 30 or 45 minutes as usual, or you can leave the dough to continue the bulk fermentation overnight on the counter (not in the fridge). As long as the room temperature isn’t too warm, the bulk fermentation should continue slowly throughout the night without over-fermenting.
- The next morning, preheat your oven to 500° F (with your Dutch oven inside).
- Remove dough from container and put on a floured work surface. Shape it into a ball and dust it with flour. The 30 minute bench rest is optional at this point, depending on how relaxed the dough looks. If you want to skip the bench rest, go straight to folding your dough ball like an envelope, score it, and place it in your preheated Dutch oven.
- Bake the bread as usual – 30 minutes with lid on, then lower the temperature to 470° F, remove the lid, and bake for 15-25 more minutes.
- Remove from the oven and let cool before cutting.
- Enjoy!
And there you have it! Your own homemade, artisan, sourdough bread!
With sourdough, every loaf is unique…so don’t worry if your first few loaves look a little funny! Mastering a live fermented culture truly is a craft, so don’t be afraid to experiment and try out different things.
You can make all different kinds of sourdough bread. Put in more whole wheat flour for a whole wheat loaf, or more all purpose flour for a white loaf. You can also add in yummy goodies such as sesame seeds, raisins, dates, walnuts, herbs, etc.
Have fun trying out different things and finding your favourite loaf and method.
I hope you enjoyed these sourdough starter and bread recipes. I’d love to hear about your experience with sourdough – feel free to comment below!